7 Minute Read:
Blogging can be one of the best and easiest ways to increase traffic to your site. Not only does blogging allow you to add more content to your website (and more in-depth content that may have a better chance of ranking on search engines), it also shows Google that you are willing to put in the time and effort to improve your site.
Google loves this and chooses to reward sites that regularly add or update content. This reward comes in the speed at which Google indexes your pages. And the faster that Google indexes your site, the sooner you will be able to start competing in search engine results .
In addition to the above benefit, blogs also provide you with the perfect opportunity to cross-link between pages on your site, the value of which cannot be understated in terms of SEO and rankability. That, paired with the additional space to expand on targeted keywords, makes blog posting an invaluable tool. We will provide tips for beginners and others below.
Posting on WordPress
WordPress is a form of free software that allows you to create and post to your website. This is written in PHP and paired with a MySQL or MariaDB database.
Because WordPress is so commonly used, it is essential to understand how to post a blog to your site.
Writing a blog post for your WordPress site can be a daunting task, but with a little bit of research and preparation, you can easily create a post that will be both informative and engaging for your readers. By researching and preparing a variety of articles that are both informative and engaging, you can create a post that will be interesting and useful to your readers.
WordPress Posting Steps
- Log into your WordPress account using your username and password.
- You will be directed to your WordPress Dashboard.
This dashboard will give you a brief overview of your site, including your recent activity, site health status, and upcoming WordPress events and news. While these all provide helpful information, this particular page is not necessary to post a blog.
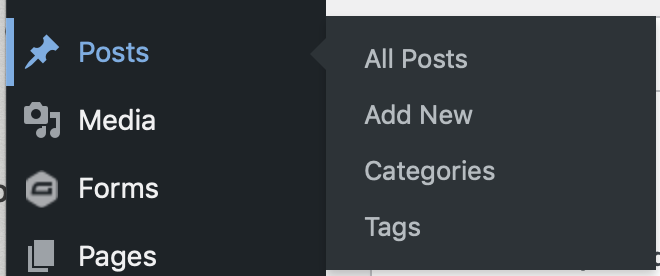
- On the left-side panel of the screen, you will see a list of commands. Near the top, there should be a listing for “Posts.” Once you hover over that, you will see an expanded section that will give you options between “All Posts, Add New, Categories, and Tags.” Select “Add New.” This takes you to the posts screen
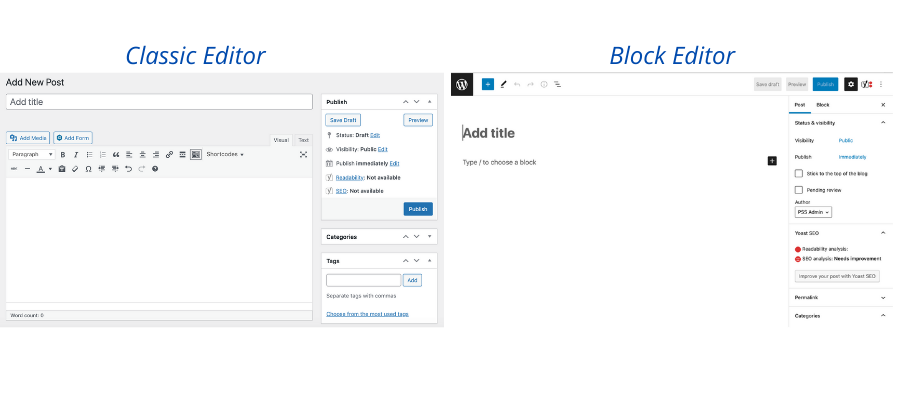
- The look of your WordPress template may vary slightly, depending on whether your WordPress uses Classic Editor or Block Editor. However, don’t worry! While the page may look slightly different, the process is nearly the same
- The first step is to add your “Title.” While the exact length of this title is up to you, SEO experts believe that to optimize the title the ideal length is between 20 and 70 characters (not words!).
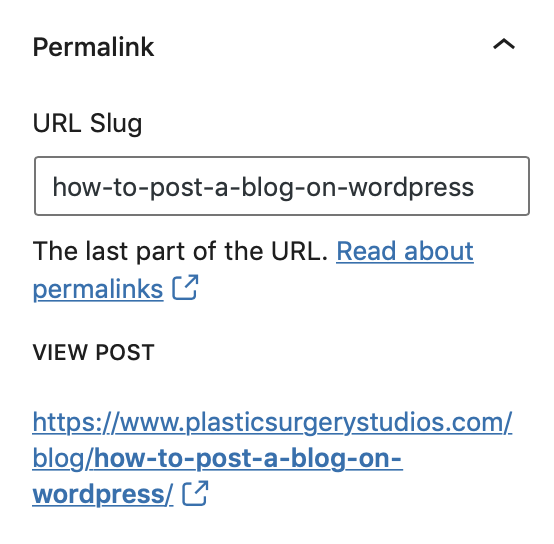
WordPress will automatically pull the URL for the blog from this title, separated with hyphens. For instance, for this particular blog, the URL would read plasticsurgerystudios.com/blog/how-to-post-a-blog-on-wordpress.
If your title is on the longer side and you wish to shorten the URL shown on your website and search engines, you can alter it in WordPress. Simply go to the right-side panel and find “Permalink.” You will then be able to create any URL you wish — just be sure to separate the words with a hyphen.
- Add your content. Whether you are writing your content directly into WordPress or copying over from a Word or Google Doc document, you can add your blog text directly into the main section of the page.
Classic Editor: You will be able to manipulate the text just as you would on a Word document or any other text format. You can add additional spaces using the “return” key and remove spaces with “delete.” Additionally, all of your tools are displayed at the top of the section. If you want to change the text to a heading (H1, H2, H3, H4, etc.), change “paragraph” to the heading you desire. You can also easily choose to bold, underline, or italicize any words or phrases as desired.

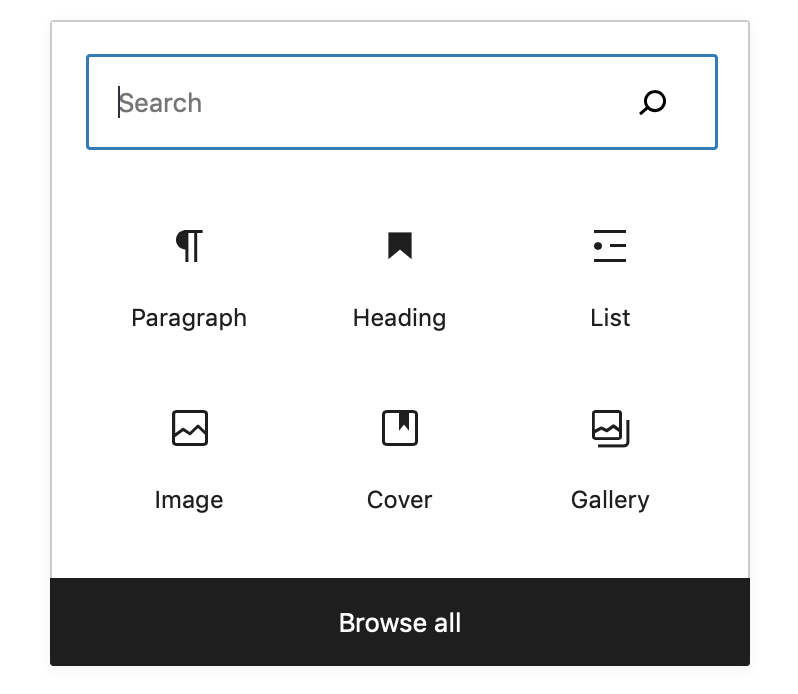
Block Editor: The block editor varies slightly from this. You will still be able to paste your content into the WordPress text box; however, this format isolates each paragraph into its own “block.” You can still create a new block by pressing the “return” key, or, if you want to add a section in between two existing sections, you can hover your cursor in between the two blocks until you see the “+” symbol. Once you click that, you will see a list of options including “Paragraph,” “Heading,” List,” and “Image.” If you wish to add another section, simply choose the “Paragraph” option.

Additionally, with Block Editor, you will not have the same displayed toolbar as the Classic Editor. Instead, your toolbar will pop up whenever you are working on a block.
- Include hyperlinks. Hyperlinks and cross-linking are essential to the success of your web pages. Be sure to include these wherever possible. You can do so by highlighting the anchor text with your cursor and clicking on the “insert/edit link” button. This is shown here.
- Select and add images. As we all know, we are subconsciously attracted to web pages that have a visual appeal. Images, infographics, and graphs all help to increase the visual aspect of the blog. Plus, they break up the text, which can help significantly with readability.
Whether you are adding your own images or stock images, be sure to resize them to “Web” size and compress them if possible. There are many free websites that will compress your images without sacrificing image quality. The smaller the file size, the faster the image will load on your site.
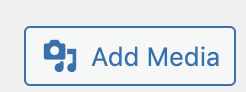
Classic Editor: Adding an image is easy. Simply click on the “Add Media” button at the top of the text box. Make sure the cursor is currently sitting where you want the image to be. You will then be able to upload your image to your Media Library.
Block Editor: To add an image to a block editor, use your cursor to locate the “+” symbol where you want your image to be, and select the “Image” option. From here, you can upload your images to your Media Library.
For both editors, you will be able to resize your image as needed. You will also be able to add text to the image (if you need to include a disclaimer, such as “Model”). Additionally, you will need to create your Alt Text.
Your Alt Text (alternative text) is usually a brief, one-sentence description of the image. This description will help Google understand what the photo is of and be used to assist visually impaired visitors.Be sure to describe the photo accurately even if it is a screenshot.
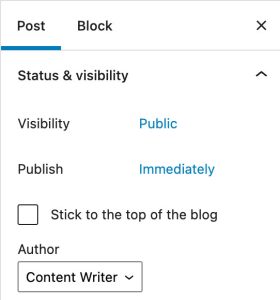
- Add a category. On the right-side panel (of both editors), you will see a section labeled as “Category.” These will be the main topics of your posts. You will want to identify the primary subject of your blog. For instance, a blog discussing breast augmentation options would be best suited for a category named “Breast Augmentation.” These categories should be very short (no more than three or four words). Additionally, you don’t want to add too many categories to each blog. You can add two or three, but try to limit it there. More categories do not relate to more traffic.
- Include a meta description. If you scroll down beneath your text, you will see a box for “Meta Description.” A meta description is the short summary of your blog post that will show on google. Usually, you are given the space of roughly 160 characters. Any more than this will be cut off.
- Review your blog. Once you have added your text, images, meta description, and categories, you are just about ready to post. The last thing you want to do is review how it will look once posted. At the top of the right-side panel, you will see a “Preview” button. Once clicked, it will show you a mock-up of how the blog will look once it is live. From here, you can see if there are any adjustments that need to be made (for example, extra spaces, images in the wrong place, headings the wrong size, etc.)
- Once you have reviewed your blog post, you are ready to post your blog. In the same area as the “Preview” button, you will see the “Post” one. This section will also allow you to choose the date of your blog post (whether you want it to go live the day you are posting, backdate it, or schedule it for a future date). The choice is up to you.
Need Extra Blog Posting Assistance?
Blogs are a beneficial addition to your website; however, as you can see above, it takes some time and practice posting those blogs. At Plastic Surgery Studios, our team is skilled in all versions of WordPress and is happy to post your blogs for you. Please contact us today by calling (888) 525-6360 or fill out our online contact form.